Fakturownia PrestaShop — Complete Installation Guide
Fakturownia Pro connects your PrestaShop store to Fakturownia.pl or InvoiceOcean (both use the same API) and automates invoice creation for every order. This guide walks you through installation, API connection, and your first invoice rule — from zero to working in under 10 minutes. It also covers upgrading from older versions, multistore installation, and a post-install verification checklist.
Requirements
Before installing Fakturownia Pro, confirm your environment meets these requirements:
| Requirement | Minimum version | How to check | |---|---|---| | PrestaShop | 8.0 (tested up to 9.0.3) | Admin → Advanced Parameters → Information | | PHP | 8.1 (compatible with 8.1, 8.2, 8.3, 8.4) | Admin → Advanced Parameters → Information | | PHP extension | cURL (standard on all modern hosts) | Admin → Advanced Parameters → Information → PHP info | | Account | Active Fakturownia.pl or InvoiceOcean account | fakturownia.pl |
Verifying Server Requirements Step by Step
Check your PHP version:
- Log in to PrestaShop Admin
- Go to Advanced Parameters → Information
- Look for "PHP" in the server configuration table — you will see the exact version number (e.g., "8.2.15")
- If the version is below 8.1, contact your hosting provider and request a PHP upgrade before installing the module
Verify cURL is installed:
- On the same Information page, scroll to the "PHP info" section
- Search the page for "curl" — you should see a "curl" section with "CURL support: enabled"
- If cURL is not listed as enabled, contact your hosting provider — it is a standard extension and should be enabled on any modern host
Check your PrestaShop version:
- Your PrestaShop version is shown at the top of the Information page under "Shop Information"
- Versions 8.0 through 9.0.3 are fully tested and supported
- If you are on PrestaShop 1.7.x, Fakturownia Pro will not install — upgrade PrestaShop first
Step 1: Download the Module
After completing your purchase on plugkit.io, you will receive a download link via email within a few minutes. Download the file — it will be named fakturapl.zip and contains the module package ready for upload.
Important: Keep the ZIP file intact. Do not unzip it before uploading. PrestaShop expects the original ZIP file from the distribution.
If you do not receive the email within 10 minutes, check your spam folder. The email is sent from noreply@plugkit.io. You can also log in to your plugkit.io account, go to My Orders → Downloads, and download again at any time — your download link does not expire.
Step 2: Upload to PrestaShop
-
Log in to your PrestaShop Admin Panel
-
Navigate to Modules → Module Manager
-
Click "Upload a module" in the top-right corner

-
Select the
fakturapl.zipfile from your computer -
PrestaShop will upload, unpack, and install the module automatically
After a few seconds, the module appears in your module list as "Fakturownia Pro — Fakturownia & InvoiceOcean Integration". If you do not see it immediately, search for "fakturownia" in the module search bar.
What if the upload fails?
The most common reasons for upload failure:
- File size limits: Your server's
upload_max_filesizeandpost_max_sizePHP settings may be too low. Check these in your hosting control panel. The module ZIP is under 1MB — even a 2MB upload limit should be sufficient. - Permissions: The
modules/directory must be writable by the web server. On a standard cPanel host, the permissions should be 755. Contact your host if PrestaShop cannot write to the modules directory. - Renamed file: Do not rename the ZIP. PrestaShop derives the module folder name from the ZIP filename.
Step 3: Locate Your API Token
Before opening the module configuration, retrieve your API token from Fakturownia:
- Log in to your Fakturownia.pl account (or InvoiceOcean)
- Click your account name in the top-right and select Settings
- Go to Account → Integration
- Find the API Authorization Code section and copy the token
The token looks like a long string of letters and numbers, for example: AwIsZLvfOVXEGz4cNnLa/yoursubdomain. The part after the / is your Fakturownia subdomain — the module extracts it automatically.
Warning: Do not confuse the API Authorization Code with the OAuth client secret or the bearer token that also appear on the same Integration page. The API Authorization Code is the correct token type for this module. If you paste the wrong token, the connection test will fail with a 401 error.
Step 4: Configure the API Connection
- Back in PrestaShop Admin, click "Configure" next to Fakturownia Pro
- The module opens on the Connection tab
- Paste your API token into the API Token field
- Leave Custom Domain empty (it auto-detects from your token)
- Click "Test Connection"
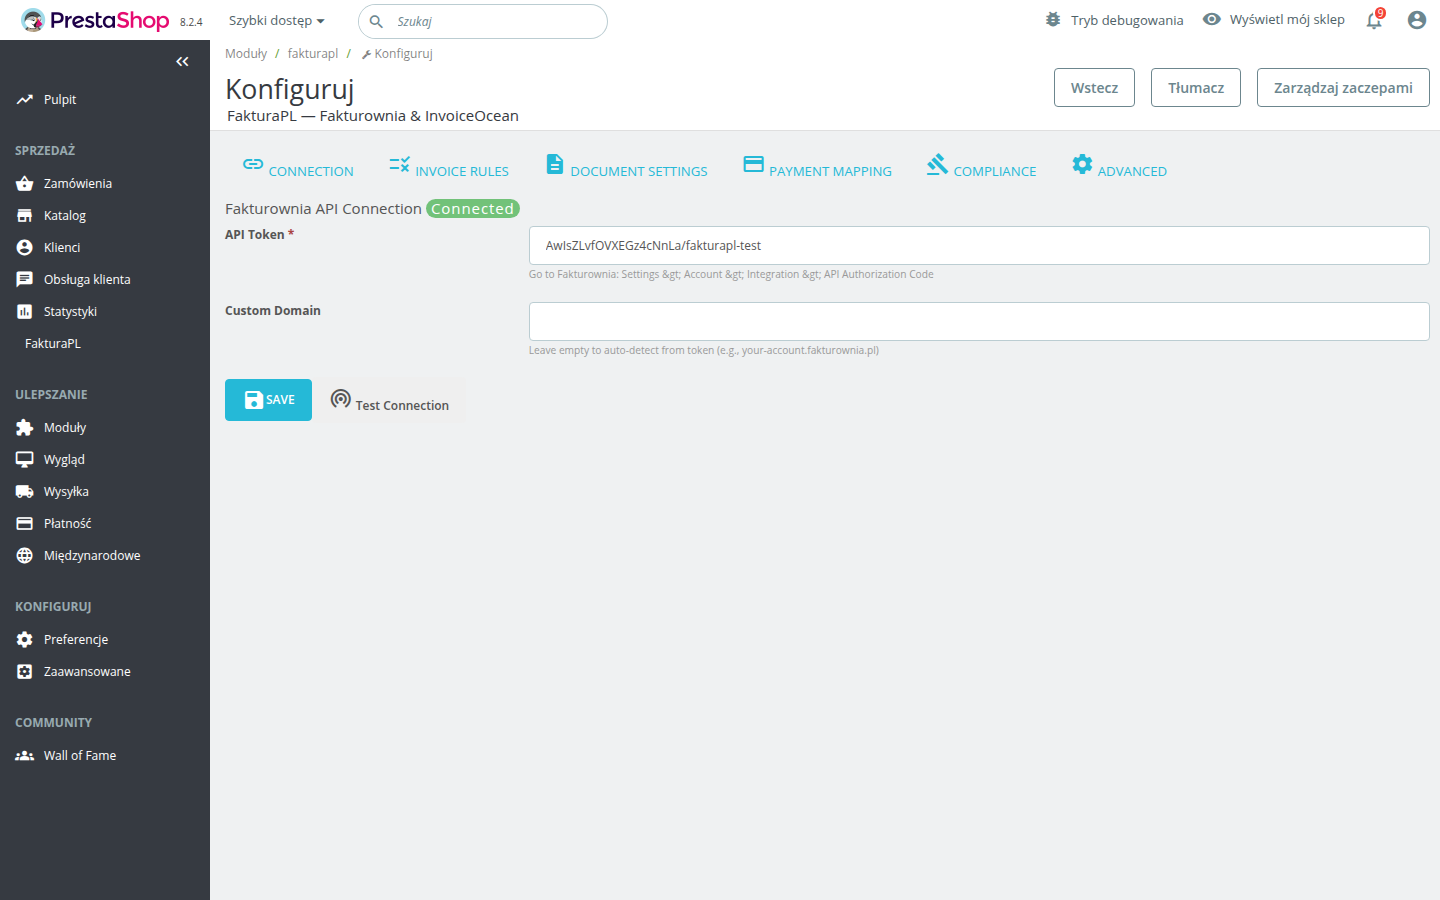
A green "Connected" badge confirms the connection is working. If you see an error, work through the checklist below before proceeding.
Connection test troubleshooting
| Error message | Most likely cause | Fix |
|---|---|---|
| 401 Unauthorized | Wrong token or wrong token type | Re-copy the API Authorization Code from Fakturownia Integration page |
| Could not resolve host | Server cannot reach fakturownia.pl | Ask your host to confirm outbound HTTPS is allowed |
| Connection timed out | Firewall blocking outbound port 443 | Ask your host to whitelist fakturownia.pl on port 443 |
| Invalid domain | Using a white-label account | Enter your custom domain in the Custom Domain field |
Step 5: Set Up Your First Invoice Rule
Navigate to the Invoice Rules tab. This is where you tell the module what to do at each order status change.
A recommended starting configuration for most Polish stores:
| Order Status | Action | Send Email | Also Mark as Paid | |---|---|---|---| | Payment accepted | Create VAT Invoice | Yes | Yes | | Awaiting bank transfer | Create Proforma | Yes | No | | Shipped | No Action | — | — | | Refunded | Create Correction | Yes | — | | Cancelled | Cancel Invoice | No | — |
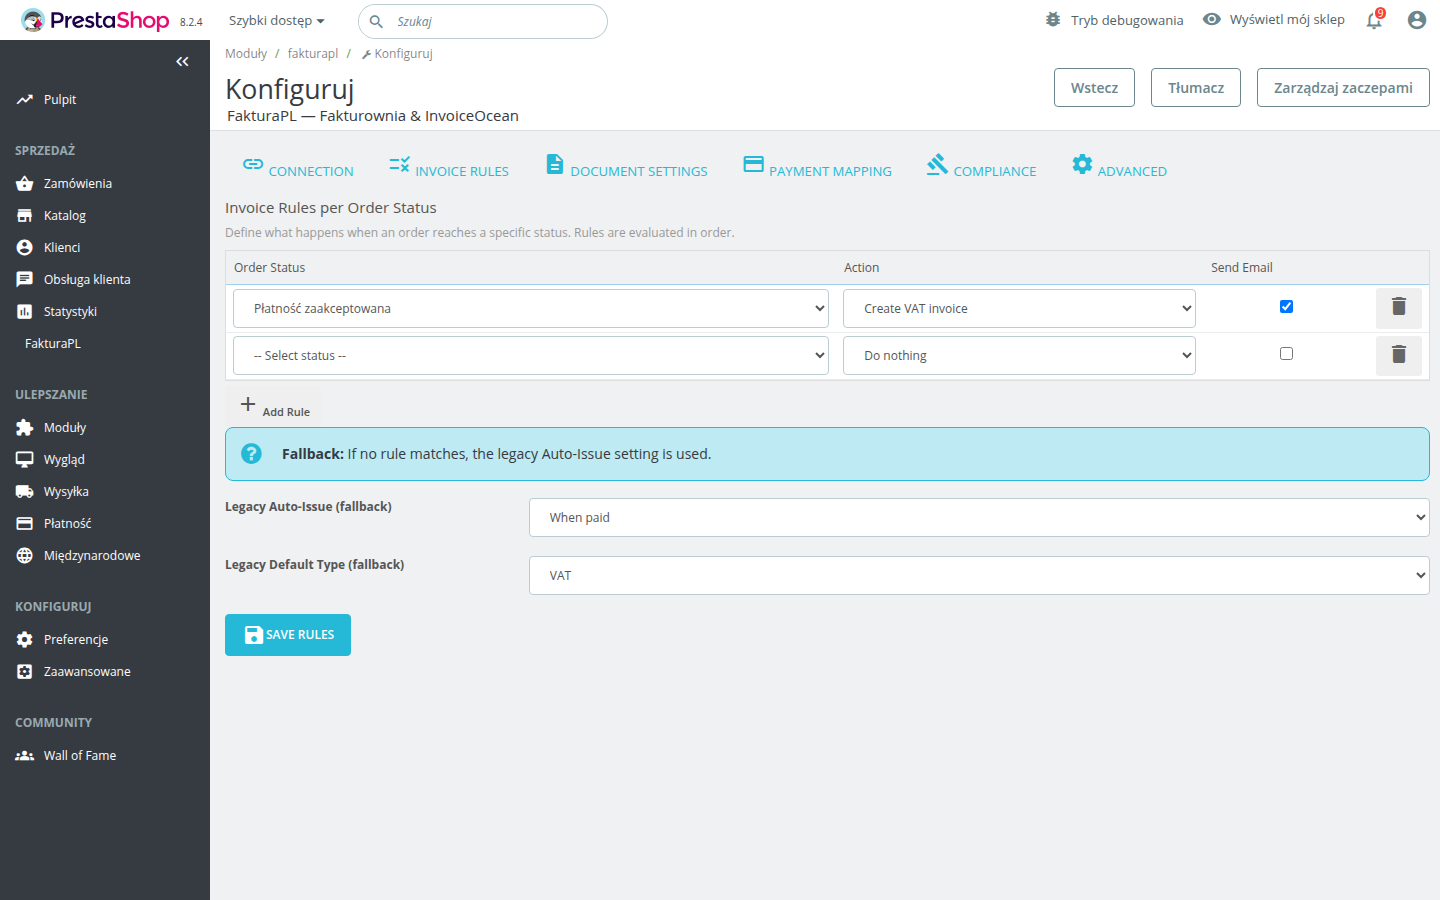
For a typical Polish B2C store using card payments or Przelewy24, the "Payment accepted" → "Create VAT Invoice" rule (with "Also Mark as Paid" enabled and email on) handles 95% of orders with a single rule.
Step 6: Verify on a Test Order
Place a test order in your store or use an existing order in your admin, then manually change its status to trigger the rule you configured. After the status change:
- Check the order detail page in PrestaShop Admin — a Fakturownia Pro panel should appear showing the invoice number and a PDF download link
- Log in to Fakturownia.pl and confirm the invoice was created with the correct buyer name, amounts, and tax rates
- If email was enabled, check that the buyer received the invoice PDF by email
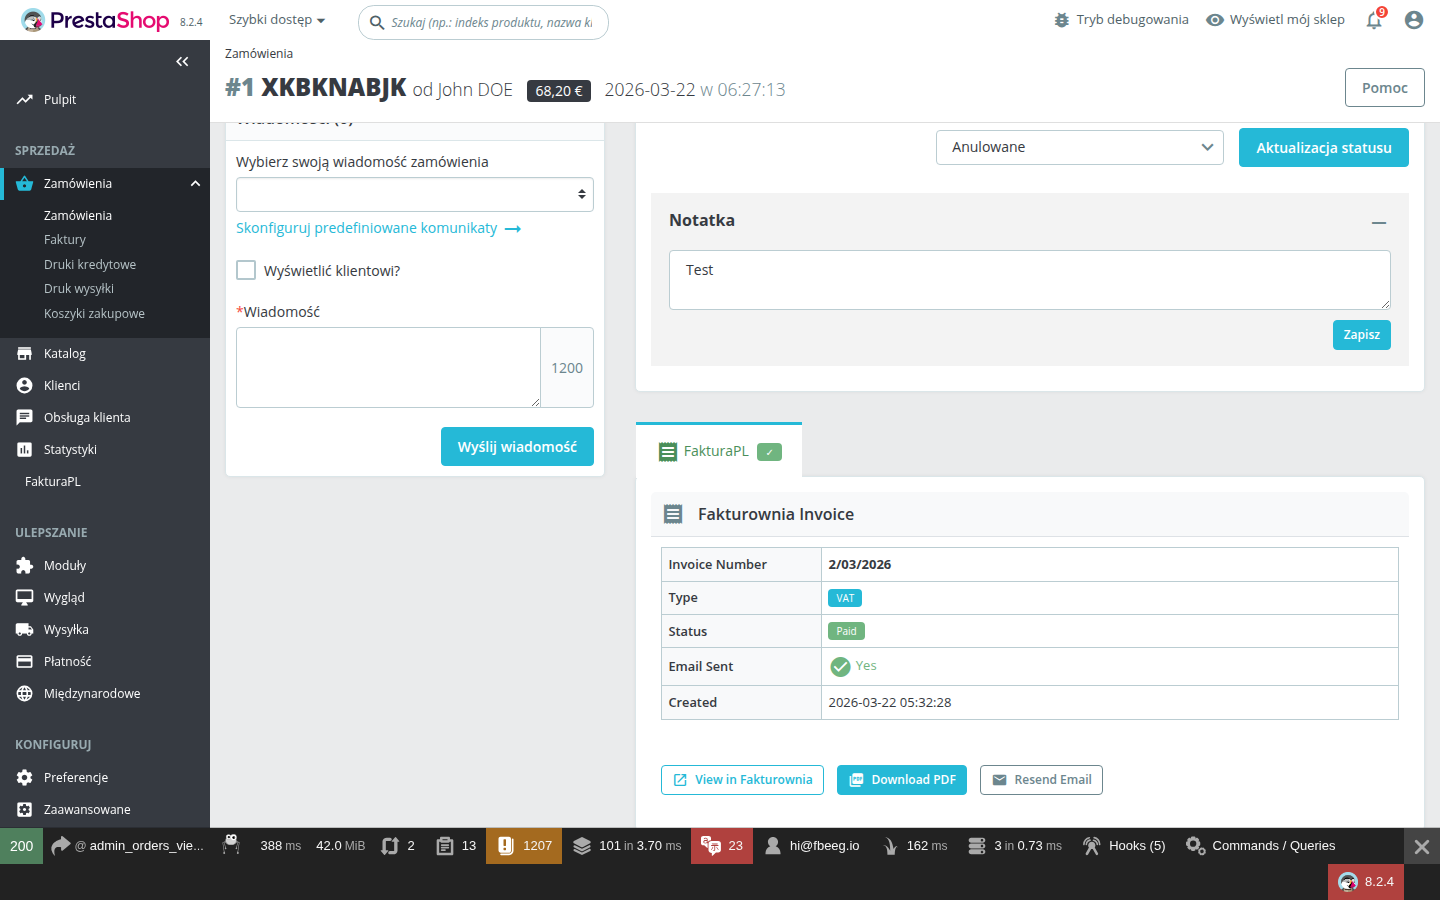
If no invoice panel appears on the order page, check Advanced Parameters → Logs for entries from "Fakturownia Pro" — the log entry will explain exactly what failed.
Multistore Installation
If you use PrestaShop's multistore feature, Fakturownia Pro can be installed and configured separately for each shop, or shared across shops with per-shop overrides.
Installing on all shops
- In the PrestaShop admin header, select "All Shops" from the shop context selector
- Upload and install the module as described above
- The module is now available (but not configured) on all shops
Configuring per shop
Fakturownia Pro stores its configuration separately per shop context. To configure each shop:
- Select the specific shop from the admin header shop selector (e.g., "Shop 1 — Main Store")
- Open Fakturownia Pro configuration
- Enter the API token and configure rules for that shop
- Repeat for each additional shop
A single Fakturownia account can be used for all shops (invoices will be in the same Fakturownia account), or you can enter different API tokens per shop to keep accounting separate.
Per-shop invoice numbering
If using one Fakturownia account for multiple shops, configure separate invoice series in Fakturownia (Settings → Invoice numbering) to distinguish which shop issued each invoice — for example, FV_SHOP1/{{month}}/{{year}} and FV_SHOP2/{{month}}/{{year}}.
Upgrading from an Older Version
When a new version of Fakturownia Pro is released, upgrading preserves all your existing settings.
Upgrade procedure
- Log in to your plugkit.io account → My Orders → Downloads
- Download the latest ZIP file
- In PrestaShop Admin → Modules → Module Manager, click "Upload a module"
- Upload the new ZIP — PrestaShop detects the existing installation and updates in place
- Your configuration (API token, invoice rules, all settings) is preserved automatically
Post-upgrade steps
- Clear cache: Go to Advanced Parameters → Performance → Clear cache after every upgrade
- Review new settings: New versions often add new configuration options that default to off. Open the configuration panel and check for any unfamiliar settings, particularly in the Document Settings and Compliance tabs
- Test a rule: Manually trigger an invoice rule on a test order to confirm the upgrade did not affect existing functionality
Rollback procedure
If an upgrade causes unexpected issues:
- Download the previous version ZIP from your plugkit.io account (previous versions are available under My Orders)
- Upload it via Module Manager — PrestaShop will downgrade in place
- Your settings will not be affected by a rollback
Post-Installation Checklist
Use this checklist after every fresh install or upgrade to confirm the module is working correctly:
- [ ] PHP version is 8.1 or newer (check Advanced Parameters → Information)
- [ ] cURL extension is enabled (check PHP info section on the same page)
- [ ] API token is entered and the "Test Connection" button shows a green "Connected" badge
- [ ] At least one invoice rule is configured (Invoice Rules tab)
- [ ] A test order has been placed and an invoice rule fired successfully
- [ ] The invoice panel appears on the order detail page in PrestaShop Admin
- [ ] The invoice PDF can be downloaded from the order panel
- [ ] If email is enabled on any rule: confirm the test customer received the invoice email
- [ ] If multistore: repeat the API connection test in each shop context
- [ ] OID Deduplication is enabled (Advanced tab) if your payment gateway sends retry webhooks
- [ ] PrestaShop cache was cleared after installation
Next Steps
- Configuration Guide — detailed walkthrough of every setting across all 6 tabs
- Invoice Rules — deep dive into per-status rules, proforma sequences, and edge cases
- Compliance — EU OSS, GTU codes, KSeF, and split payment setup
- Troubleshooting — solutions to the most common issues